Bluetooth LE for Mobile - 3. iOS Central
The story so far:
- An Overview
- iOS Peripheral
- iOS Central
- Android Peripheral
The last post focused on how to make an iOS device become a BLE peripheral. This one will discuss being a central. There were some general tips for iOS too so if you’re jumping in here I’d recommend at least reading the previous post.
iPhones and iPads make fantastic centrals. It doesn’t matter so much what the peripheral is – as centrals they are reliable, fast, and in most cases recover cleanly from error conditions. My first time doing BLE was on iOS communicating with a LightBlue Bean and I thought this level of reliability was normal. How naive I was. Android does generally work but if you have the opportunity to make a BLE app that’s iOS-only then you’ll have an awesome time.
The Apple documentation Performing Common Central Role Tasks hasn’t been updated for a few years. It does have some Objective-C snippets relevant to this topic.
Scanning for advertisements
The starting point for an iOS central is CBCentralManager.
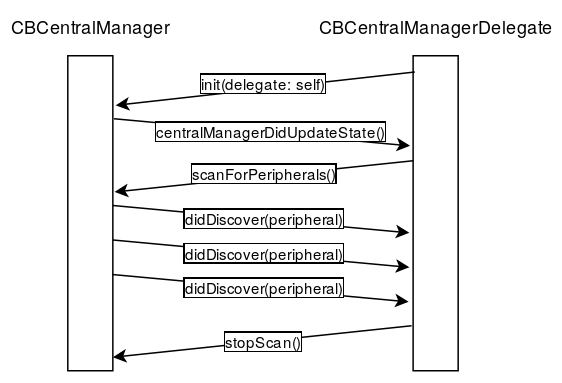
- Initialise a new instance, passing in your own class that implements
CBCentralManagerDelegate. - Wait until the delegate receives
centralManagerDidUpdateState()to confirm BLE is available. - Call
scanForPeripherals(), optionally filtering by the service UUID. - Wait until the delegate receives the
didDiscovermethod, which includes an instance ofCBPeripheral, advertisement data and an indication of signal strength. This method will be called for each peripheral that is discovered. - If you wish, establish a connection to a peripheral. Assign a delegate to the
CBPeripheraland callconnect()on theCBCentralManager. (More about this shortly) - When finished scanning, call
stopScan().
Do pay close attention to the CBCentralManager’s state notifications – if it’s not poweredOn (and this transition takes time) then you can’t scan. The user is also free to switch off Bluetooth at any time and the app has to deal with the consequences.
When starting the scan there are a couple of important choices to make. The first is whether you want your app to get a callback for every advertisement that a peripheral transmits, or to just get notified once when a peripheral first comes into range. If you have no special need for the continuous stream of advertisements then it will be better for your users’ batteries to stick with just one callback.
The second choice is whether to filter peripherals by the service UUIDs they include in their advertisements. If you are trying to connect to a particular kind of device then this is a good idea because it means you won’t be notified about every set of wireless headphones and iBeacon you come across. This simplifies your programming and again saves battery. If on the other hand you’re making a utility that scans for all BLE peripherals in range, then you would choose not to have any filtering.
Accessing advertised data
I’ve previously suggested that if an application can get away with using only broadcast advertisement data, without establishing connections, then it should. This process is fast and reliable.
In the delegate method where advertisements are delivered to your app you get a dictionary of values that may or may not be present depending on what the peripheral chose to include. (As far as I can tell iOS automatically performs a Scan Request/Response to capture extra data when it’s split over two advertisement packets.)
If the other peripheral is an iOS app then they have have limited control over the content of the advertisements. They can set only the local name and the service UUIDs and the name can’t be very long. The other keys may be of interest if you’re communicating with non-iOS peripherals.
One more warning: Android peripherals can in certain situations transmit a previous, out-of-date local name for one or two advertisements before the new name takes effect. It’s bizarre but true and this may be an issue as an iOS central if you act on the first name you see.
Connecting to a peripheral
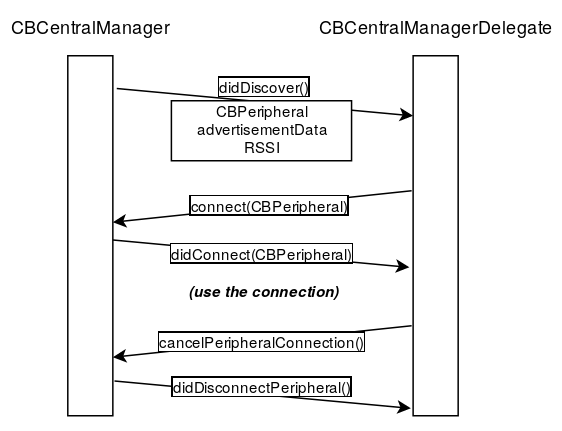
Often advertisements are not enough and we need to establish a stateful connection to the peripheral. Before you can connect to a peripheral you have must received an advertisement from it. The advertisement delegate method will receive the CBPeripheral that you need – hold onto it and you can use it to make a connection either immediately or later, assuming they’re still in range.
The opening and closing of connections is done by calling methods on the CBCentralManager, passing the CBPeripheral as a parameter. Once connected, all service and characteristic operations are initiated directly on that CBPeripheral.
So establishing a connection is an “outer” process that involves the manager. Since it’s the CBCentralManager doing it, success or failure of that connection will go to the CBCentralManagerDelegate.
Notice that the delegate will also get a notification when we have finished disconnecting from a peripheral. Don’t try connecting to that peripheral again until we get that notification. As mentioned in the last post, all BLE things take time and iOS will tell you when it’s ready.
Once the connection is established there is more work to do – discovery. First you must discover the service you want, then you must discover characteristics within that service to which you want to read, write or subscribe. It is necessary to go through the motions even if you’ve connected before, and even if you know exactly what kind of device it is based on the advertisement.
This may seem tedious but it’s worthwhile – it gives you the opportunity to specify exactly which service UUIDs and characteristic UUIDs you want. If this is a relatively small number of characteristics it will be extremely fast, because it won’t bother retrieving anything else.
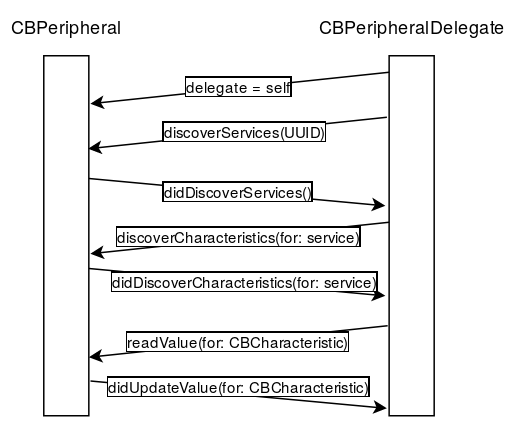
Once you have a CBPeripheral that’s connected and has a CBPeripheralDelegate configured, you can go ahead and do things like readValue() and writeValue(), passing in the CBCharacteristic you want to work with. Each of these operations will result in a corresponding success or failure delegate method.
Unless you have a lot of idle time in your connections I would recommend only trying to do one thing at a time – i.e., connect to only one peripheral and do only one read/write before doing the next one.
Rangefinding with RSSI
RSSI numbers are essentially made up. The “I” stands for “indication”. No BLE devices can compensate for the physical layout of the space they’re in. There can be enormous variation in RSSI values between different devices when they are the same distance apart. The advantage of iOS is that all devices are made by the same manufacturer so there is consistency in the Bluetooth hardware and RSSI algorithms.
That said, you can estimate distance approximately. Apple offers it with iBeacons – see their CLProximity enum. If “The beacon is relatively close to the user” sounds vague… well, yes it is. I don’t recommend it.
Scanning and connecting in the background
iOS doesn’t let us have a lot of fun when our apps are in the background so BLE is a pleasant surprise. Your app can’t start scanning from the background – for example, when the user first turns on their phone. However if your app is launched and it has the right background mode, scanning will continue after the user switches to another app – even after the iPhone is locked. Just be aware that scanning happens at a much reduced rate so it will take longer to detect advertisements.
What’s more, when a peripheral is detected your app’s code will be called and will have the opportunity to establish a connection and read characteristics, all without any user interaction. Depending on what you discover you might choose to launch a local notification, or simply do nothing.
Summary
This post introduced CBCentralManager and CBPeripheral and the things you can do with each to implement a full-featured BLE central in iOS. If you’re following along the series, you now have a pretty complete idea of how the iOS Core Bluetooth API hangs together. That means Android next time!