Migrating a DekiWiki in 2019
MindTouch DekiWiki (later MindTouch Core) was an amazing wiki for its time. Even now, years after it went out of support, I couldn’t name an equivalent with strictly hierarchical pages and a user-friendly rich text editor.
Once upon a time it was available for free as a community edition, up until MindTouch changed their business model. Unfortunately by then it had been enthusiastically adopted by a bunch of people and as the years drag on those people have been looking at their out-of-date Deki installations and wondering what to do. I recently had to deal with one of them.
An entertaining post on jeddi.org tells the story well and documents their attempts to upgrade the DekiWiki image to a more recent version of Debian. That’s one possible approach. In my case I really wanted to move the data out to a product with ongoing commercial support. I selected Atlassian Confluence for two key reasons:
- It has a hierarchy like Deki: a page can be a child of another page and this shows up in the left navigation menu. However all page titles live in a global namespace, which means that some work is required to avoid collisions.
- There is an old open source Universal Wiki Converter for Confluence that includes a MindTouch exporter. It doesn’t appear to have been worked on for years and it has showstopper bugs. Once I fixed those it does provide an automatic process for exporting and importing a Deki that could scale to arbitrary sizes.
In fact, this was the only good solution I could come up with. Without the Confluence UWC I would have been stuck trying to get the data out myself and it would have been horrific.
In this post I want to point out all the challenges I hit along the way and what I did to get around them. Unfortunately the UWC is not under a defined open source licence so I don’t really want to publish a “fixed” JAR in case someone sends in the lawyers. However I’ll take my chances sharing a patch that you can apply to the repo yourself and rebuild.
Overall process:
- Get the UWC tool patched up, configured and running on your workstation
- Install an appropriate JDK and Eclipse
- Get the UWC code as a git repo
- Import it into eclipse and get it building
- Fix several code errors
- Run it with sufficient heap space to download big attachments
- Edit the config files that come with the program
- Enable verbose logging in log4j so problems are easy to identify, and locate log file
- Get Deki administrator credentials that can see all data
- Run the Export process. At the end, your PC has a folder containing a hierarchy of XML files and their associated attachments.
- Set up Confluence for the Convert (i.e. import) process
- Create a Space for uploading data
- Ensure it has plenty of heap space for uploading big attachments
- Configure Confluence settings
- Get a user account that has appropriate permissions
- Run a conversion through UWC, which uploads pages and attachments from your local machine to Confluence
- Review the logs to identify the collisions and other errors that will require manual import or cleanup
- Perform final cleanup
In the rest of this post I will describe each of these items in detail.
1. Get UWC running
1.1 Install JDK/Eclipse
For this task I used the Oracle Java 8 SDK and Eclipse on Windows 10. Download and install if them if you don’t have them already.
Make sure Java is in your path and runs the correct version from the command prompt.
C:\Users\tk>java -version
java version "1.8.0_201"
Java(TM) SE Runtime Environment (build 1.8.0_201-b09)
Java HotSpot(TM) 64-Bit Server VM (build 25.201-b09, mixed mode)
1.2 Get UWC git repo
I am assuming for this example that you have git installed on Windows, either directly or through WSL, both for cloning the code and to apply the code patch that comes in a later step.
When I searched for migration tools, I located the UWC on the Atlassian Migrations wiki. It hasn’t had much love for a while but the docs are still relevant. Note that if you follow the links you end up on an ancient download page which I couldn’t get to work at all.
Instead I found this appfusions repo which was last touched in September 2016. This is much newer and I was able to get it to work with some fiddling.
The first step is to clone this repo somewhere on your computer. Here I’m using the bash shell in Ubuntu WSL.
$ git clone https://bitbucket.org/appfusions/universal-wiki-converter
Cloning into 'universal-wiki-converter'...
remote: Counting objects: 3389, done.
remote: Compressing objects: 100% (1873/1873), done.
remote: Total 3389 (delta 1371), reused 3012 (delta 1144)
Receiving objects: 100% (3389/3389), 8.74 MiB | 1.89 MiB/s, done.
Resolving deltas: 100% (1371/1371), done.
Checking out files: 100% (1734/1734), done.
1.3 Import into eclipse and build
The presence of a build.xml file in the root indicates that this uses the Ant build system.
Firing up eclipse, I can import this into my workspace:
- Right click inside Package Explorer on the left, choose Import…
- Select: General > Projects from Folder or Archive
- Click the Directory button, and choose the
universal-wiki-converterfolder that was cloned by git - Click Finish
After the import you should see the files under Package Explorer, including build.xml.
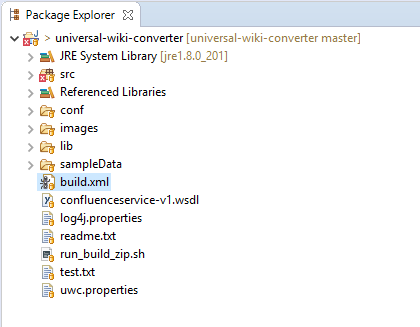
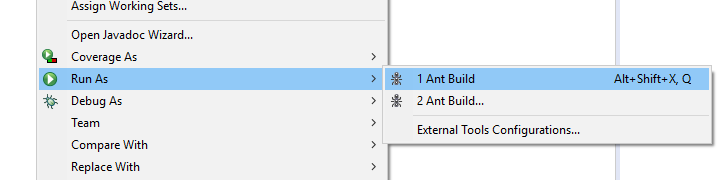
To build it, right click on build.xml and select Run As > Ant Build. It will probably fail at this point, but after the fixes are applied you will hopefully see a successful build reported in the console at the bottom of the window.
The project is configured to place the compiled software and all supporting files in the target/uwc subdirectory.
Warning: All the template config files are copied over on every build! If you edit them inside the target directory, they will be reset to defaults if you run the Ant build again. Either save those files, or copy the target folder somewhere else while you run it.
1.4 Fix several code errors
Four main problems came up which required changes to the UWC code. I’m going to briefly explain them here but it’s not really important. Download this patch file and see instructions below about how to apply the fixes.
Some type definitions have changed in newer versions of Java, which means names in the existing code are ambiguous and need to be specified more clearly.
There were some characters in an encoding test that caused the Java compiler on my machine to freak out so I simply deleted them. (This happens to break the test, but I don’t mind.)
UWC authenticates to the Deki using HTTP Basic Authentication. There is code in UWC that looks like it should respond to a Basic Auth challenge, but in practice it simply doesn’t. As a result you get unauthorised errors and nothing exports. Other Java programmers have come across the same problem and one reliable fix is to create the authentication header manually, so that’s what I did.
The final problem is that certain XML parsing errors throw a RuntimeException, which terminates the entire export process. If you have messed-up markup in your pages—which is easy to do if you copy random content from the web into Deki’s editor—it’s preferable to just keep going and patch them all up at the end. As shown a little later, it is possible to identify the affected articles from the log. They were never going to work automatically anyway so I don’t consider this a big deal.
I’ve worked around all four of these problems in this patch file. Download it and place it in the universal-wiki-converter folder. Run the following command:
$ git am uwc-fixes-thomask.patch
Applying: Fix Type name conflict
Applying: Remove characters in test that cause eclipse to error out and not compile
Applying: Alternative method of HTTP Basic auth that works
Applying: Don't abort with RuntimeException on XML parse error
Hopefully you won’t run into any more code problems, but if you do, you now have an IDE ready to go for debugging.
1.5 Run UWC
Having applied the patch above and rebuilt via build.xml, let’s try to run it. If it has to process attachments it can run out of Java heap space, so we’ll give it 2 GB. Open a command prompt to universal-wiki-converter\target\uwc and run this command:
java -Xms2048m -Xmx2048m -classpath .\;lib\* com.atlassian.uwc.ui.UWCForm3Hopefully it will run and a GUI will pop up. If you like, you could create a file named uwc.bat and place that command in it to make this easier to run.
1.6 Update UWC config files
Now that UWC is up and running, close it again. It’s time to change the configuration files under the conf/ subdirectory. This is actually pretty well documented on the Atlassian Migrations wiki and you should take the time to read that page. You need to review the two files exporter.mindtouch.properties and converter.mindtouch.properties.
Here I will point out which lines I changed. You may need more.
Exporter
url.base=http://my.deki.com
url.port=80
The URL of the Deki I am exporting. I didn’t use a trailing slash.
user=username
pass=password
The credentials for the Deki administrator that will download all the content.
output.dir=tmp\A relative path where the exported files should be placed on the local machine. Here I used a trailing backslash since I’m on Windows. Ensure you create this folder yourself.
ignore.mindtouch=falseI had to set this to false. I’m not sure if this would apply to everybody. With the default value of true, it ignored the root of my deki and zero pages were exported.
Converter
Mindtouch.0203.filepath-hierarchy-ignorable-ancestors.property=C:\Users\tk\...\tmp\exported_mindtouch_pagesThe exporter will save its stuff into the subdirectory tmp\exported_mindtouch_pages. Include the full path on the filesystem with no trailing backslash.
Mindtouch.4300.exportdir.property=C:\Users\tk\...\tmp\exported_mindtouch_pagesSet the exportdir property to the exact same path.
1.7 Configure log4j/logging
It can be helpful to change the log4j.properties file to show much more information about what’s going on, especially if you encounter problems beyond those that I’ve described here.
- Copy
log4j.propertiesfrom the rootuniversal-wiki-converterfolder down intotarget/uwc. (This step alone will prevent the error on startup about the missing file.) - Edit that file in a text editor and change
#log4j.logger.com.atlassian.uwc=DEBUGso it doesn’t have the#at the beginning. This gives you a nice medium level of output and I would recommend it. - If you are stuck on a more serious problem, change
log4j.rootCategory=INFO, A1, A2tolog4j.rootCategory=DEBUG, A1, A2. This will make everything extremely verbose.
While UWC is running it will both log to the command prompt and also to the file uwc.log. You can safely delete it after closing the program. I would recommend that you delete it between each major step—i.e., do the export, copy out uwc.log and name it the “export log”, delete it, do the convert, copy out uwc.log and name it the “convert log”. You will need to review these files later on and it’s easier to make sense of it if they’re separate.
2. Get Deki admin account
In fact, it doesn’t need to be an admin. You just need a user with sufficient privileges to see all the data. This goes into the user and pass config variables mentioned earlier.
Note that the UWC does not support exporting the user pages—the ones you see when you click on a username. That’s because they aren’t included in the sitemap API that lists all pages. If you want those, copying them out is left as an exercise for the reader.
3. Run the export
The actual export is extremely straightforward once all the prerequisites are in place.
- Create the
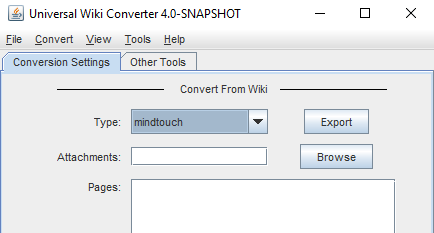
universal-wiki-converter\target\uwc\tmpsubdirectory where the output will be placed. (The export will crash with aNullPointerExceptionif you don’t create this yourself.) - Run UWC and choose mindtouch from the drop-down box at the top of the screen.
- Click the Export button
It will pop up a progress dialog but also show more information on the command prompt, especially if you changed uwc to DEBUG logging in log4j.properties. It will download the pages, tags, comments, attachments and write everything to the output subdirectory tmp\.
4. Configure Confluence
4.1. Create a space
Even if you want to mix your data into an existing space, I’d recommend creating a temporary space first while you experiment with the process. Spaces are easy to delete and recreate until you’re happy with the result.
When you create a space you give it a human-readable name and also a Space Key, which is the bit that appears in the Confluence URL. This Space Key is how you tell UWC where to upload your pages.
4.2. Ensure Confluence has enough heap
While “converting” (i.e. uploading) to Confluence I kept running into strange problems where I’d upload a big attachment and UWC would freeze forever. After investigating the logs on on the server side I realised that it was actually caused by Confluence running out of heap space.
/opt/atlassian/confluence/logs/catalina.out
Exception in thread "http-nio-8090-exec-12" java.lang.OutOfMemoryError: Java heap space
Exception in thread "http-nio-8090-exec-3" java.lang.OutOfMemoryError: Java heap space
Exception in thread "http-nio-8090-exec-15" java.lang.OutOfMemoryError: Java heap space
For reasons I don’t fully understand, uploading a ~150 MB attachment required several gigabytes of heap memory. I ended up giving it 4 GB by following their instructions.
4.3. Configure Confluence settings
In the administrator settings you will need to make two changes.
- Ensure the maximum attachment size is big enough for all attachments you have on the Deki. (Instructions)
- Turn on the remote API, which is off by default. (Instructions)
4.4. Get a Confluence user account
You will need to provide UWC with the username and password of an account that can create pages and upload attachments in the Space.
5. Run the conversion
By the time the export finished it should have created a subdirectory called tmp\exported_mindtouch_pages. This is the one you need.
Cycle your log files and re-run UWC.
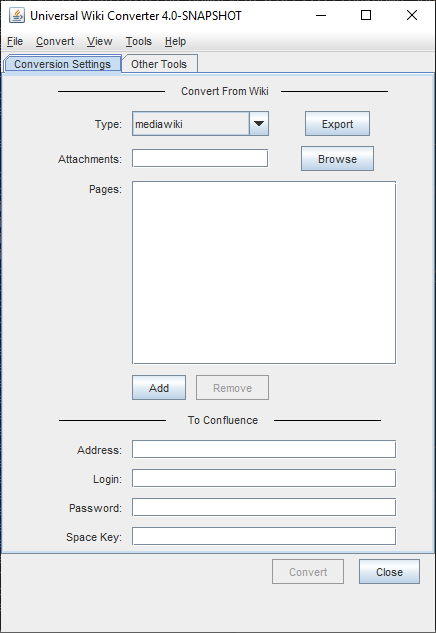
- Leave Attachments set to blank.
- Under Pages, click the Add button. A file browser will pop up.
- Navigate to that
tmp\exported_mindtouch_pagesfolder and select it. The full path of the folder will be added to the list as a single entry. This looks weird, but it’s what the Mindtouch converter expects. - Under the To Confluence section, add the URL of the confluence instance such as
http://something:8090/, the username and password of the uploading account, and the Space Key where the pages will be uploaded. - Click Convert.
Again a long process will occur, with most of the interesting output taking place in the command prompt. Make sure you save the uwc.log log file from this part too.
6. Review the logs and clean up from errors
You should probably search for the word “error” in both the export and convert log. However, there are three main varieties that I found in the convert stage:
Parse errors
2019-03-05 10:07:58,623 DEBUG [Thread-4] - original file name: 450_PageName.xml
2019-03-05 10:07:58,623 DEBUG [Thread-4] - Xml Parser - Starting
2019-03-05 10:07:58,623 ERROR [Thread-4] - Error while parsing xml. Skipping
java.lang.NullPointerException
or
2019-03-05 10:14:56,807 ERROR [Thread-4] - REMOTE_API_ERROR: Could not transform wiki content in page: 'Page Name' from markup to xhtml.In these situations, the page will probably be created but it will contain the raw XML Deki source or have other problems with the content. The easiest fix is to update it manually: locate the page on both Deki and Confluence, select the Deki page text and copy/paste it into the rich text editor on Confluence.
As you can see, both errors are shown near the name of the affected page so it’s possible to go through the log file and make a list. In practice this will probably be a minority of pages—in my experience it’s happened where people have copy/pasted weird HTML content directly from a webpage into Deki, where it saved it verbatim.
Warning: Attachments/comments may not have come across either, so check those manually.
Collision errors
2019-03-05 10:50:03,342 ERROR [Thread-4] - Potential namespace collision detected for pages: C:\Users\tk\...\1\Information, C:\Users\tk\...\2\InformationIf you see any lines like these it is extremely likely that only one of the pages has been created on Confluence. The trouble is that Confluence doesn’t support having two pages in the same space with the same title. In DekiWiki this is okay provided they are located under different parents.
If the number is small you could just check all the pages manually (the paths in the error message indicate where they are in the tree) and recreate those that are missing. Again, don’t forget about any attachments!
If there are a bunch of them, which there were for me, you might want to make a list, go back to Deki and rename them so they have unique names, then repeat the entire export/convert process. (This is actually pretty quick once everything is set up. This is also a good reason to test it on a temporary Space first.)
7. Final cleanup
There were two final issues in my migration that I fixed manually.
The root of my Deki was created as a child of the Space root. As a result, the Confluence left menu had only one item and I needed to click on it to see any of the children. It may be possible to fix this in the convert process but I just repaired it manually—I went to each of the second-level pages and moved them so the Space root was their parent. I then copied the page content of the imported root to the Space root then deleted it.
Also, a handful of pages were at the root instead of at the correct place in the hierarchy. I’m not entirely sure what went wrong. I moved them back to the correct parent.
Conclusion
Good luck. I’m sorry that you had to read this. If you have any further questions I probably can’t help you.

2 Comments
Ash
16 Jan 2020
Thanks so much for this, I found it also to use https://github.com/QyenidQuartz/Mindtouch-to-Flare-Conversion-Tool as I was getting some 404 errors when doing the export and this allowed me to search thru the attachments folder and find what page was causing the error.
Enrique San Valero
02 Sep 2020
Your post was really useful for me! Thank you very much. As you say, dekiwiki was an amazing software and the only closer solution I've found is confluence. I've successfully migrated my instance of Dekiwiki to confluence using some API tricks and some python code. If you need some guidelines about this, please contact me at esanval(at)gmail.com